5 Low-Sugar Dairy-Free Ice Cream Recipes
Five easy dairy-free ice cream recipes with under 8g sugar per serving using coconut milk, bananas, nut butters and low-sugar sweeteners.
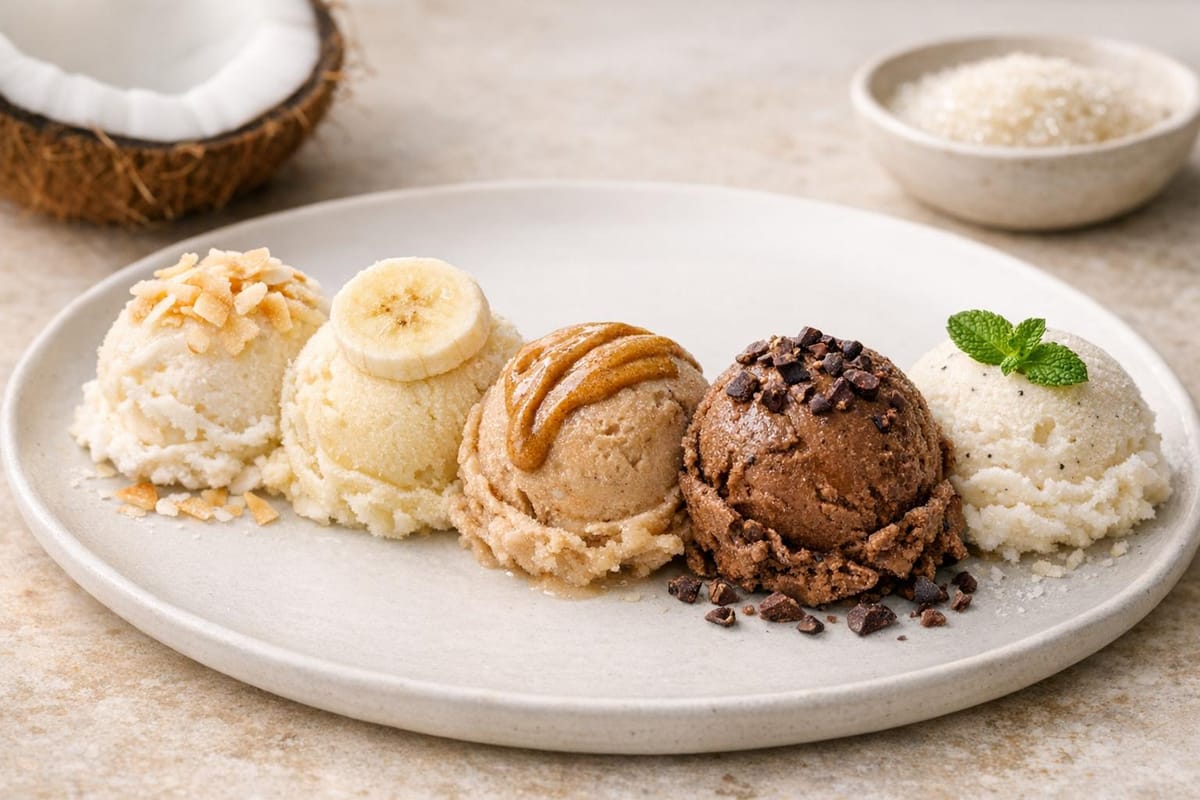
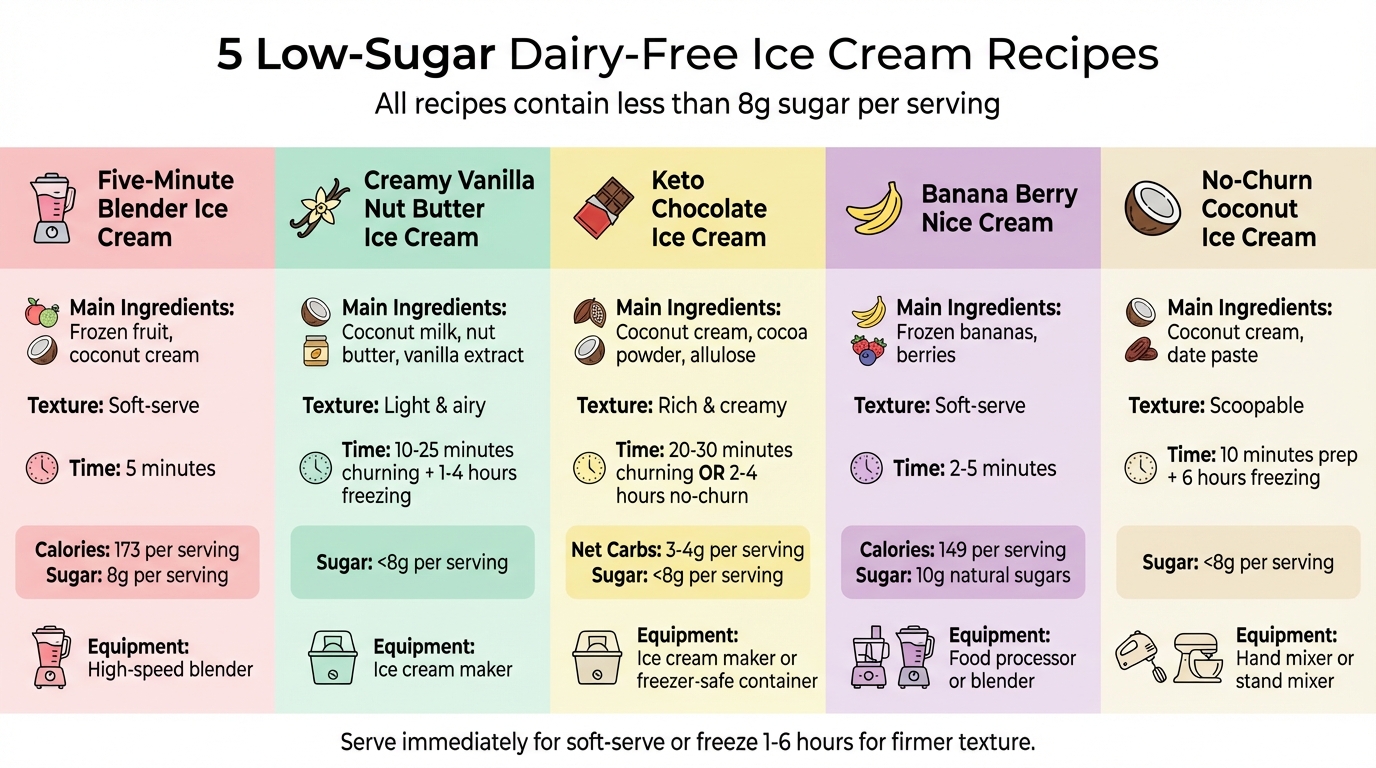
Love ice cream but want to skip dairy and reduce sugar? These five recipes offer simple, healthier alternatives using whole ingredients like coconut milk, bananas, and nut butters. They’re naturally sweetened, easy to make, and require minimal equipment. Each recipe keeps sugar under 8 grams per serving while delivering creamy, indulgent textures. Here’s a quick overview:
- Blender Ice Cream: Uses frozen fruit and coconut cream for a soft-serve texture.
- Vanilla Nut Butter Ice Cream: Combines coconut milk and nut butter for a classic vanilla flavor.
- Keto Chocolate Ice Cream: Features coconut cream and low-carb sweeteners for a rich, chocolatey treat.
- Banana Berry Nice Cream: Relies on frozen bananas and berries for a naturally sweet dessert.
- No-Churn Coconut Ice Cream: Whipped coconut cream with date paste for a scoopable, dairy-free option.
These recipes are perfect for anyone avoiding lactose or looking for healthier dessert options. Just blend, freeze, and enjoy!
5 Low-Sugar Dairy-Free Ice Cream Recipes Comparison Chart
6 Dairy Free Ice Cream Recipes (Vegan, Whole30, Sugar Free, Gluten Free) Nice Cream
1. Five-Minute Blender Ice Cream with Frozen Fruit
With just a high-speed blender and a few ingredients, you can whip up a creamy, soft-serve-style ice cream in minutes. This recipe relies on frozen fruit for both its base and natural sweetness, while coconut cream lends a rich, velvety texture similar to traditional ice cream. Fruits like raspberries, mango, and banana are excellent choices - they blend effortlessly and deliver bold, delicious flavors. Let’s break down the key components of this quick, no-churn dessert.
Base Ingredients
The secret to achieving a smooth, creamy texture lies in using full-fat coconut milk or coconut cream. These provide the richness needed to prevent an icy consistency. Adding a tablespoon of almond or cashew butter not only contributes healthy fats but also helps keep the ice cream soft, balancing the lower sugar content.
Sweetener Options
Often, the natural sweetness of ripe frozen fruit is enough, so you may not need to add extra sweeteners. However, if you prefer a sweeter treat, consider using liquid sweeteners like maple syrup or agave nectar. For a low-sugar alternative, monk fruit or stevia can work, but pair them with a stabilizer like xanthan gum or an extra spoonful of nut butter to preserve the creamy texture. A pinch of sea salt can also enhance the fruit’s flavor without adding sugar.
How to Make It
Start by adding your frozen fruit, coconut cream, and any additional flavorings to a high-speed blender. Pulse until the fruit starts to break down, then switch to high speed, using a tamper to keep everything moving. In about a minute, you’ll have a smooth, soft-serve consistency. Serve immediately for the freshest texture, or transfer the mixture to a container and freeze for 3–6 hours if you prefer firmer scoops. If the ice cream becomes too hard, let it thaw at room temperature for 20–60 minutes before serving. For reference, a raspberry version of this ice cream contains roughly 173 calories and 8 grams of sugar per serving.
2. Creamy Vanilla Ice Cream with Nut Butter
This recipe brings the classic vanilla flavor to life without relying on dairy or loads of sugar. By combining full-fat coconut milk with smooth nut butter, you get a creamy texture that rivals traditional ice cream. Add in 2 tablespoons of high-quality vanilla extract, and the flavor truly stands out. Using an ice cream maker here ensures a light, airy consistency that’s perfect for scooping and savoring.
Base Ingredients
Full-fat canned coconut milk (brands like Thai Kitchen or Native Forest work well) gives the richness of heavy cream and prevents the ice cream from turning icy. Smooth almond or cashew butter - about 1/3 cup - adds creaminess without overpowering the vanilla flavor. As recipe developer Emily Spain notes:
"Use nut butter... this is the must-have ingredient to replace the volume of sugar, while also adding healthy fats and more creamy texture that also helps it not harden too much".
A pinch of sea salt enhances the vanilla, while up to 2 tablespoons of pure vanilla extract or vanilla bean paste delivers a bold, unmistakable flavor.
Sweetener Type
For a low-sugar option, powdered sweeteners are your best bet. Erythritol and monk fruit are popular choices because they add sweetness without introducing extra moisture, which can lead to ice crystals. Allulose is another great option, offering about 70% of the sweetness of regular sugar with a clean, mild taste. If you prefer natural sweeteners, honey or maple syrup work well, though they will add more sugar to the mix. To avoid a gritty texture, blend any granulated sweeteners into a fine powder before use. Additionally, the alcohol in vanilla extract helps keep the ice cream soft and scoopable, preventing it from freezing into a solid block.
Preparation Method
Start by combining all the ingredients - coconut milk, nut butter, sweetener, vanilla, and salt - in a high-powered blender. Blend on high for 30–60 seconds until the mixture is smooth and fully emulsified. Chill the mixture until it’s nearly frozen to avoid sticking during churning. Pour the chilled base into your ice cream maker and churn for 10–25 minutes to create a fluffy, soft-serve texture. Transfer the churned ice cream into a shallow container and freeze for 1–4 hours until firm. Since homemade dairy-free ice cream freezes harder than store-bought, let it sit at room temperature for 5–10 minutes before scooping.
3. Keto Chocolate Ice Cream with Liquid Sweeteners
This keto chocolate ice cream is all about creating a rich, indulgent treat while keeping net carbs low - just 3–4 grams per serving. The trick lies in using liquid sweeteners, which help maintain a creamy, scoopable texture, unlike granulated alternatives that can crystallize.
Base Ingredients
The foundation of this recipe is either canned coconut cream or full-fat coconut milk. Coconut cream, with its higher fat content, gives the ice cream a richer texture, while full-fat coconut milk offers a lighter option but may need stabilizers to avoid iciness. For a deep chocolate flavor, Dutch-processed cocoa powder is a must. To keep the texture smooth and creamy, add 1–2 tablespoons of MCT oil or light olive oil. A pinch of sea salt and 1–2 teaspoons of instant coffee powder enhance the chocolate flavor without overpowering it.
Sweetener Type
Choosing the right sweetener is key to achieving the perfect texture. Allulose is highly recommended because it prevents crystallization and keeps the ice cream soft. As Brenda Bennett, a Certified Keto Coach, explains:
"Allulose... is a liquid sweetener which keeps ice cream smooth and soft from the freezer."
Naomi Sherman, a recipe creator, also highlights its benefits:
"Xylitol or allulose is noted to be the best sweetener for ice cream. The reason is that it doesn't easily form ice crystals, creating smoother, creamier ice cream."
Other options include liquid stevia and liquid monk fruit, which can be combined with allulose to balance sweetness. Avoid erythritol if you plan to store the ice cream for long periods, as it tends to crystallize. For an even softer texture, mix in about 1 teaspoon of vegetable glycerin.
Preparation Method
Start by blending the coconut cream, cocoa powder, liquid sweetener, oil, vanilla extract, and salt on high for 30–60 seconds until smooth. Taste and adjust the sweetness if needed.
- With an ice cream maker: Pour the mixture into a pre-frozen bowl and churn for 20–30 minutes to achieve a soft-serve consistency.
- No-churn method: Transfer the blended mixture to a freezer-safe container. Freeze for 2–4 hours, stirring every 30 minutes during the first 2 hours with a fork to break up ice crystals.
Before serving, let the ice cream sit at room temperature for 10–15 minutes to soften slightly for easier scooping. This step ensures the perfect creamy texture every time.
4. Nice Cream with Frozen Bananas and Berries
Nice cream is a well-loved, dairy-free alternative to traditional soft-serve ice cream. Made with just frozen bananas and berries, it takes only 2–5 minutes to blend into a creamy, soft-serve consistency.
Base Ingredients
Frozen bananas are the magic behind the creamy texture. As Cleveland Clinic puts it:
"Banana is the not-so-secret ingredient, giving it a creamy texture and richness. It's a great alternative to soft-serve ice cream, and it's all natural - made from only fruit!"
Frozen berries bring vibrant color and a tangy twist. To make it extra luscious, you can mix in 1–2 tablespoons of full-fat coconut milk or coconut cream, which also helps achieve a scoopable texture. A splash of vanilla extract and a pinch of sea salt can take the fruit flavors to the next level, creating a naturally sweet dessert without any unnecessary additives.
Sweetener Type
The natural sugars in the fruit do all the work here, keeping added sugar to a minimum. Kelly from Life Made Sweeter highlights the importance of choosing ripe bananas:
"The spottier and brown the bananas, the better since they will be sweeter and you won't need to add any additional sweetener."
A single serving of nice cream contains about 149 calories, while a sugar-free version made with just coconut milk and mixed berries has around 10g of natural sugar. If your bananas aren’t fully ripe, you can add a touch of stevia or monk fruit for a calorie-free sweetness boost.
Preparation Method
Start by slicing bananas into 1-inch pieces and freezing them on a parchment-lined tray to prevent sticking. Then, blend the frozen bananas and berries in a food processor or high-speed blender. Pause every 30–60 seconds to scrape down the sides. The mixture will first crumble before turning into a smooth, creamy soft-serve. If needed, add 1–2 tablespoons of coconut milk to help it blend.
For the best soft-serve experience, serve immediately. If you prefer a firmer, scoopable texture, transfer it to a shallow container and freeze for 1–2 hours. Nice cream can be stored in an airtight container in the freezer for up to 3 months. For the creamiest results, enjoy it right after blending.
5. Coconut-Based No-Churn Ice Cream
This recipe delivers a creamy, indulgent ice cream without the need for any fancy equipment. Like the others in this series, it relies on high-quality, simple ingredients to achieve a smooth, rich texture. For the best results, opt for full-fat canned coconut milk or coconut cream, as their high fat content mimics the velvety texture of dairy.
Base Ingredients
The secret to success here is choosing the right coconut milk. Look for canned options with a high fat-to-water ratio. Avoid carton coconut milk, which often contains fillers and extra water that can compromise the texture. A touch of sea salt and a splash of vanilla extract enhance the flavor while also helping to reduce ice crystallization.
Sweetener Type
When it comes to sweetening, date paste is the standout choice for this no-churn method. As Minimalist Baker puts it:
"If you make coconut whipped cream and sweeten it with dates, good things happen... it makes the perfect base for creamy, dreamy ice cream, no churning required."
Thanks to their high sugar-to-water ratio, dates naturally resist freezing, keeping the ice cream soft and scoopable. Liquid sweeteners like maple syrup or agave nectar are also options, though they may result in a slightly firmer texture. For those seeking a sugar-free alternative, stevia or monk fruit can work, but some users note that monk fruit might affect how well the ice cream sets.
Preparation Method
To get started, refrigerate your canned coconut milk overnight. This allows the cream to separate from the liquid. Once chilled, scoop out the solid cream and whip it for 3–4 minutes until it’s light and airy. Gently fold in your chosen sweetener to maintain the airiness, which helps prevent ice crystals from forming. Pour the mixture into a shallow container, press wax paper directly onto the surface, and freeze for at least six hours. Before scooping, let the ice cream sit at room temperature for 10–20 minutes, as coconut-based ice cream tends to freeze harder than its dairy counterpart. Store any leftovers in an airtight container, and it’ll stay fresh for up to two months.
Guide to Low-Sugar Sweeteners
The recipes above highlight different ways to use sweeteners, but picking the right low-sugar option is key to achieving the best flavor and texture in your dairy-free ice cream. The sweetener you choose can have a big impact - not just on taste and consistency, but also on how it affects blood sugar. This decision is especially important for anyone aiming to make low-sugar, health-conscious frozen desserts.
Natural sweeteners like honey and maple syrup contain natural sugars that can raise blood glucose levels. However, they also offer some benefits, like antioxidants and prebiotics, which can support gut health. On the other hand, sugar-free options such as allulose and stevia generally don’t cause blood sugar spikes, making them excellent choices for keto or diabetic-friendly recipes.
Allulose is particularly noteworthy because it mimics many of the properties of regular sugar. As Ice Cream Haven explains:
"Allulose performs best for a soft, scoopable finish because it resists crystallization and adds body".
It behaves like sugar by adding moisture, but with about 90% fewer calories. When combined with a base like coconut butter, desserts made with allulose can have as little as 2.4g net carbs per serving.
For those who prefer natural, fruit-based sweeteners, options like ripe bananas, dates, and mangoes offer dual benefits as both sweeteners and thickeners. Bananas are ideal when their skins develop brown spots, signaling peak sweetness. Whole fruits like these also contain fiber, which slows sugar absorption and helps prevent sharp blood sugar spikes. Dates bring a rich, caramel-like flavor and add body, while frozen mangoes provide a light tropical sweetness without adding excess liquid.
Liquid sweeteners like honey and maple syrup also play a role in crafting flavorful ice cream. Honey is sweeter than maple syrup and contributes to a creamier texture. Recipes using honey typically contain around 7.7g of sugar per serving. Maple syrup, while less sweet, brings a unique flavor and may need to be paired with a small amount of stevia to match honey’s sweetness. Stevia itself is 200–400 times sweeter than sugar and works best in liquid form to avoid any grainy texture. Meanwhile, monk fruit dissolves smoothly, offering a clean sweetness without the cooling effect or bitterness that some sweeteners can leave behind.
For an extra touch, try adding a pinch of salt or a spoonful of coconut butter. Both can enhance the sweetness while improving the ice cream’s texture and scoopability. Now that sweeteners are covered, it’s time to dive into the tools and techniques that will help you perfect your frozen dessert creations.
Equipment and Preparation Tips
Making low-sugar, dairy-free ice cream at home is easier than you might think. All you need are a few basic kitchen tools. A high-speed blender or food processor is a must for breaking down frozen fruit, date paste, or frozen coconut milk cubes into that creamy, dreamy texture we all love. If you're whipping coconut cream for no-churn recipes, an electric hand mixer or stand mixer is your best bet to get that fluffy, mousse-like consistency. These tools are the backbone of the methods described in earlier recipes.
No ice cream maker? No problem. The "ice cube" method is a fantastic alternative. Simply pour your prepared base into silicone ice cube trays and freeze for at least 4 hours. When you're ready, let the cubes sit at room temperature for 10–15 minutes, then blend them until smooth. For storage, a freezer-safe container - like a parchment-lined 9×5-inch loaf pan - makes for easy scooping.
Temperature control is crucial for achieving that velvety texture. Chill your mixing bowl for 10 minutes before whipping coconut cream, and before serving, let your ice cream sit at room temperature for 10–20 minutes to soften slightly. Using an ice cream scoop warmed under hot water ensures clean, effortless scooping. These little steps make a big difference in maintaining the creamy consistency of your dessert.
Even basic tools can deliver excellent results:
"Between my Cuisinart Ice Cream Maker and my Vitamix blender, I can probably make everything the Creami can".
For longer storage, press wax paper or plastic wrap directly onto the surface of your ice cream before sealing the container. This simple trick minimizes air exposure and prevents freezer burn, keeping your dairy-free creation fresh and scoopable.
Conclusion
Making low-sugar, dairy-free ice cream at home gives you full control over what goes into your dessert. With just 3–5 simple, wholesome ingredients and about 10–15 minutes of hands-on time, you can whip up a treat that's not only delicious but also tailored to your preferences.
The perks? You get to enjoy desserts with less than 8 grams of sugar per serving, loaded with healthy fats, proteins, and vitamins. Plus, the base recipe is a blank canvas for endless flavor creations.
"Use the vegan ice cream recipe as a base for your own flavorings!" – Feasting at Home
Get creative by adding spices like cardamom or cinnamon, mixing in cacao nibs or toasted nuts, or swirling in nut butters or fruit jams. It’s all about making a frozen treat that works for your taste and dietary needs.
Pick a recipe, and enjoy the satisfaction of crafting your own healthier ice cream at home.
FAQs
What are the best sweeteners for making low-sugar, dairy-free ice cream?
When crafting low-sugar, dairy-free ice cream, natural sweeteners like stevia and monk fruit are excellent options. Stevia, derived from a plant, is intensely sweet - much sweeter than regular sugar - so only a tiny amount is needed. Monk fruit, another zero-calorie alternative, offers a mild sweetness that works well for keto or low-carb diets.
Another option is sugar alcohols such as erythritol and allulose. These sweeteners add flavor with fewer calories and have little effect on blood sugar levels, making them ideal for health-focused recipes. Ultimately, the best choice comes down to your personal taste and dietary goals, but both natural sweeteners and sugar alcohols are great starting points for creating satisfying, guilt-free ice cream.
How can I make creamy dairy-free ice cream without an ice cream maker?
You don't need an ice cream maker to whip up creamy, dairy-free ice cream at home. With just a few simple steps, you can create a delicious frozen treat using everyday ingredients.
One popular approach is blending full-fat coconut milk with your favorite flavorings - think vanilla extract, cocoa powder, or even fresh fruit. Once mixed, pour the base into a shallow container and pop it in the freezer. To keep the texture smooth, stir the mixture every 30–60 minutes as it freezes. This helps break up any ice crystals that might form.
Want to take it up a notch? Add cashew butter, coconut whipped cream, or soaked and blended cashews to the mix. These ingredients add richness and replicate the creamy texture of traditional ice cream. With a bit of patience and some experimentation, you’ll have a dairy-free dessert that’s smooth, satisfying, and completely customizable!
What are some fun and creative ways to customize low-sugar, dairy-free ice cream recipes?
There are so many fun ways to jazz up low-sugar, dairy-free ice cream! One simple trick is to add fresh fruits like mangoes, berries, or bananas. They bring natural sweetness and bold, fruity flavors to your treat. Want something a little more unexpected? Try blending in herbs like basil or mint. These can transform your ice cream into refreshing combinations, like mango-basil or mint-chocolate chip.
If you're in the mood for something indulgent, spices can do the trick. Think cinnamon, cardamom, or a touch of cocoa powder to create flavors like spiced vanilla or rich chocolate. For a bit of crunch or texture, toss in shredded coconut, chopped nuts, or cacao nibs. These small tweaks let you personalize your ice cream, keeping it both delicious and healthy - without the dairy!